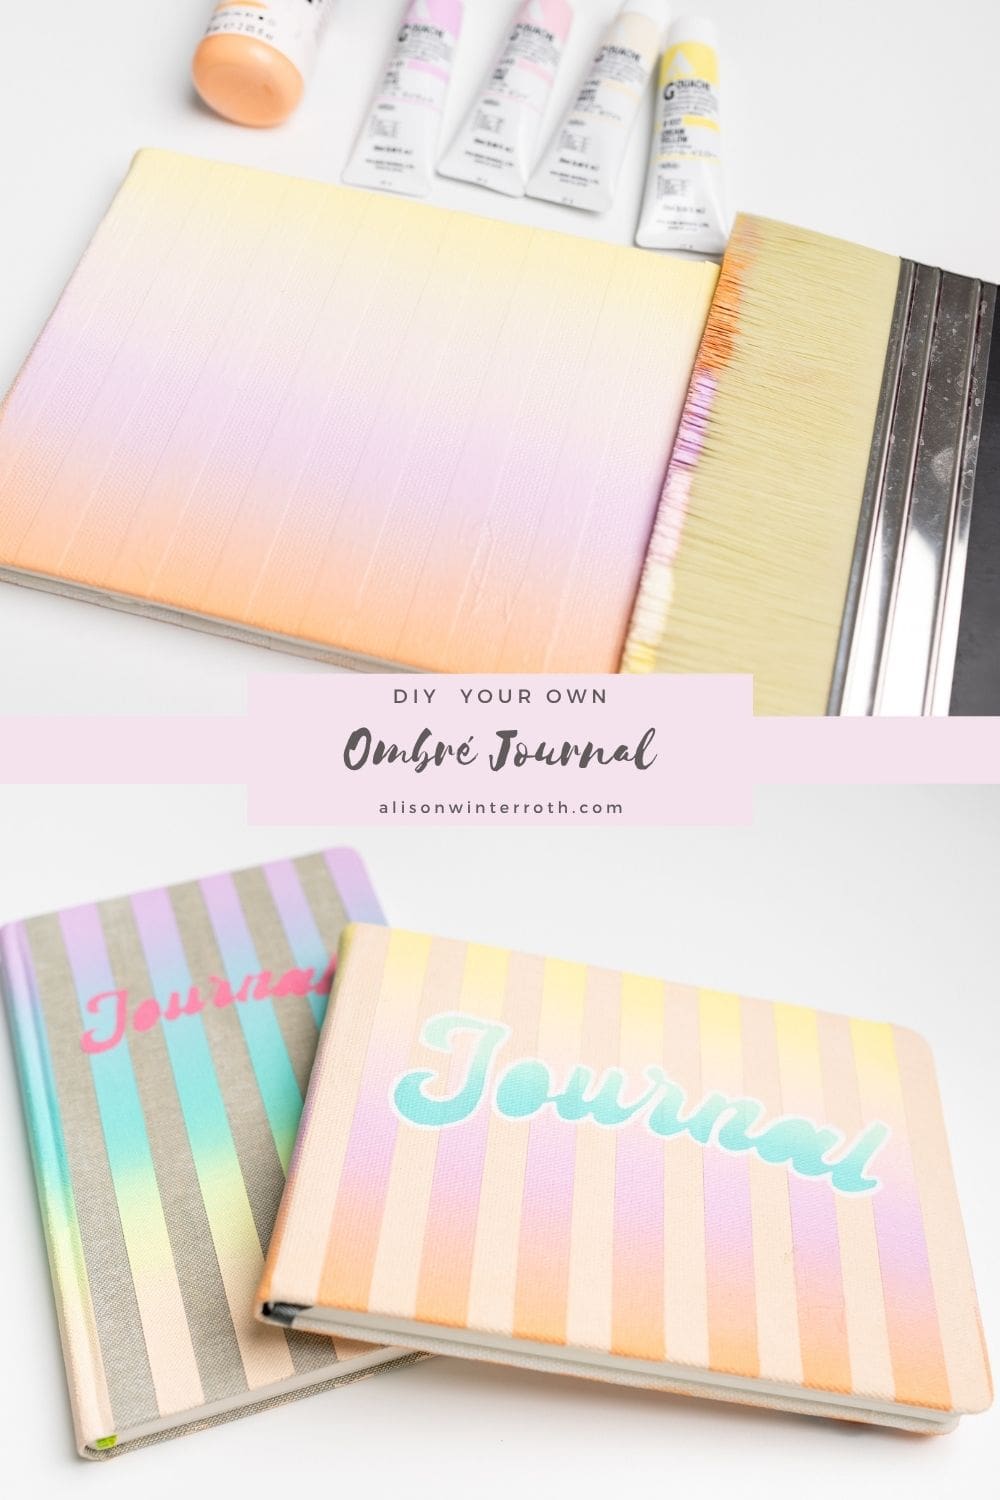
How To Instructions on to Ombre Paint Your Art Journal Cover
This post may contain affiliate links so we may receive compensation if you sign up for or purchase products linked to below. As an Amazon Associate, I can earn from qualifying purchases.
As a creative, I have a multitude of ideas all the time, and sometimes they come and go from my mind. I’ve tried keeping track on my phone, but was craving a more tangible way to compile them, combined with found objects, drawings, color combinations, and all the things that inspire me. I wanted to start writing down more of my thoughts, along with the photographs I have taken, to create art journal pages. I’m hoping to better track my life, ideas, and creativity by writing them all down. Of course, before I could begin, I had to create something that would inspire me to write, and I couldn’t find anything I could buy that felt like “me.” I decided to alter something myself, and once I had the idea, I kept working on it until I created something I was really excited about. I thought I would share the creation and the steps to make it with people as well! I adore creating these fun journals using different patterns and color combinations. They are really simple to make, and a great way to stay creative, so I thought I would share how I create them.
Note: Some of the links below are affiliate links. If you click on one and make a purchase, I may earn a small commission at no additional cost to you. This enables me to continue creating content that resonates with you. As an Amazon Associate, I earn from qualifying purchases.
What You Will Need
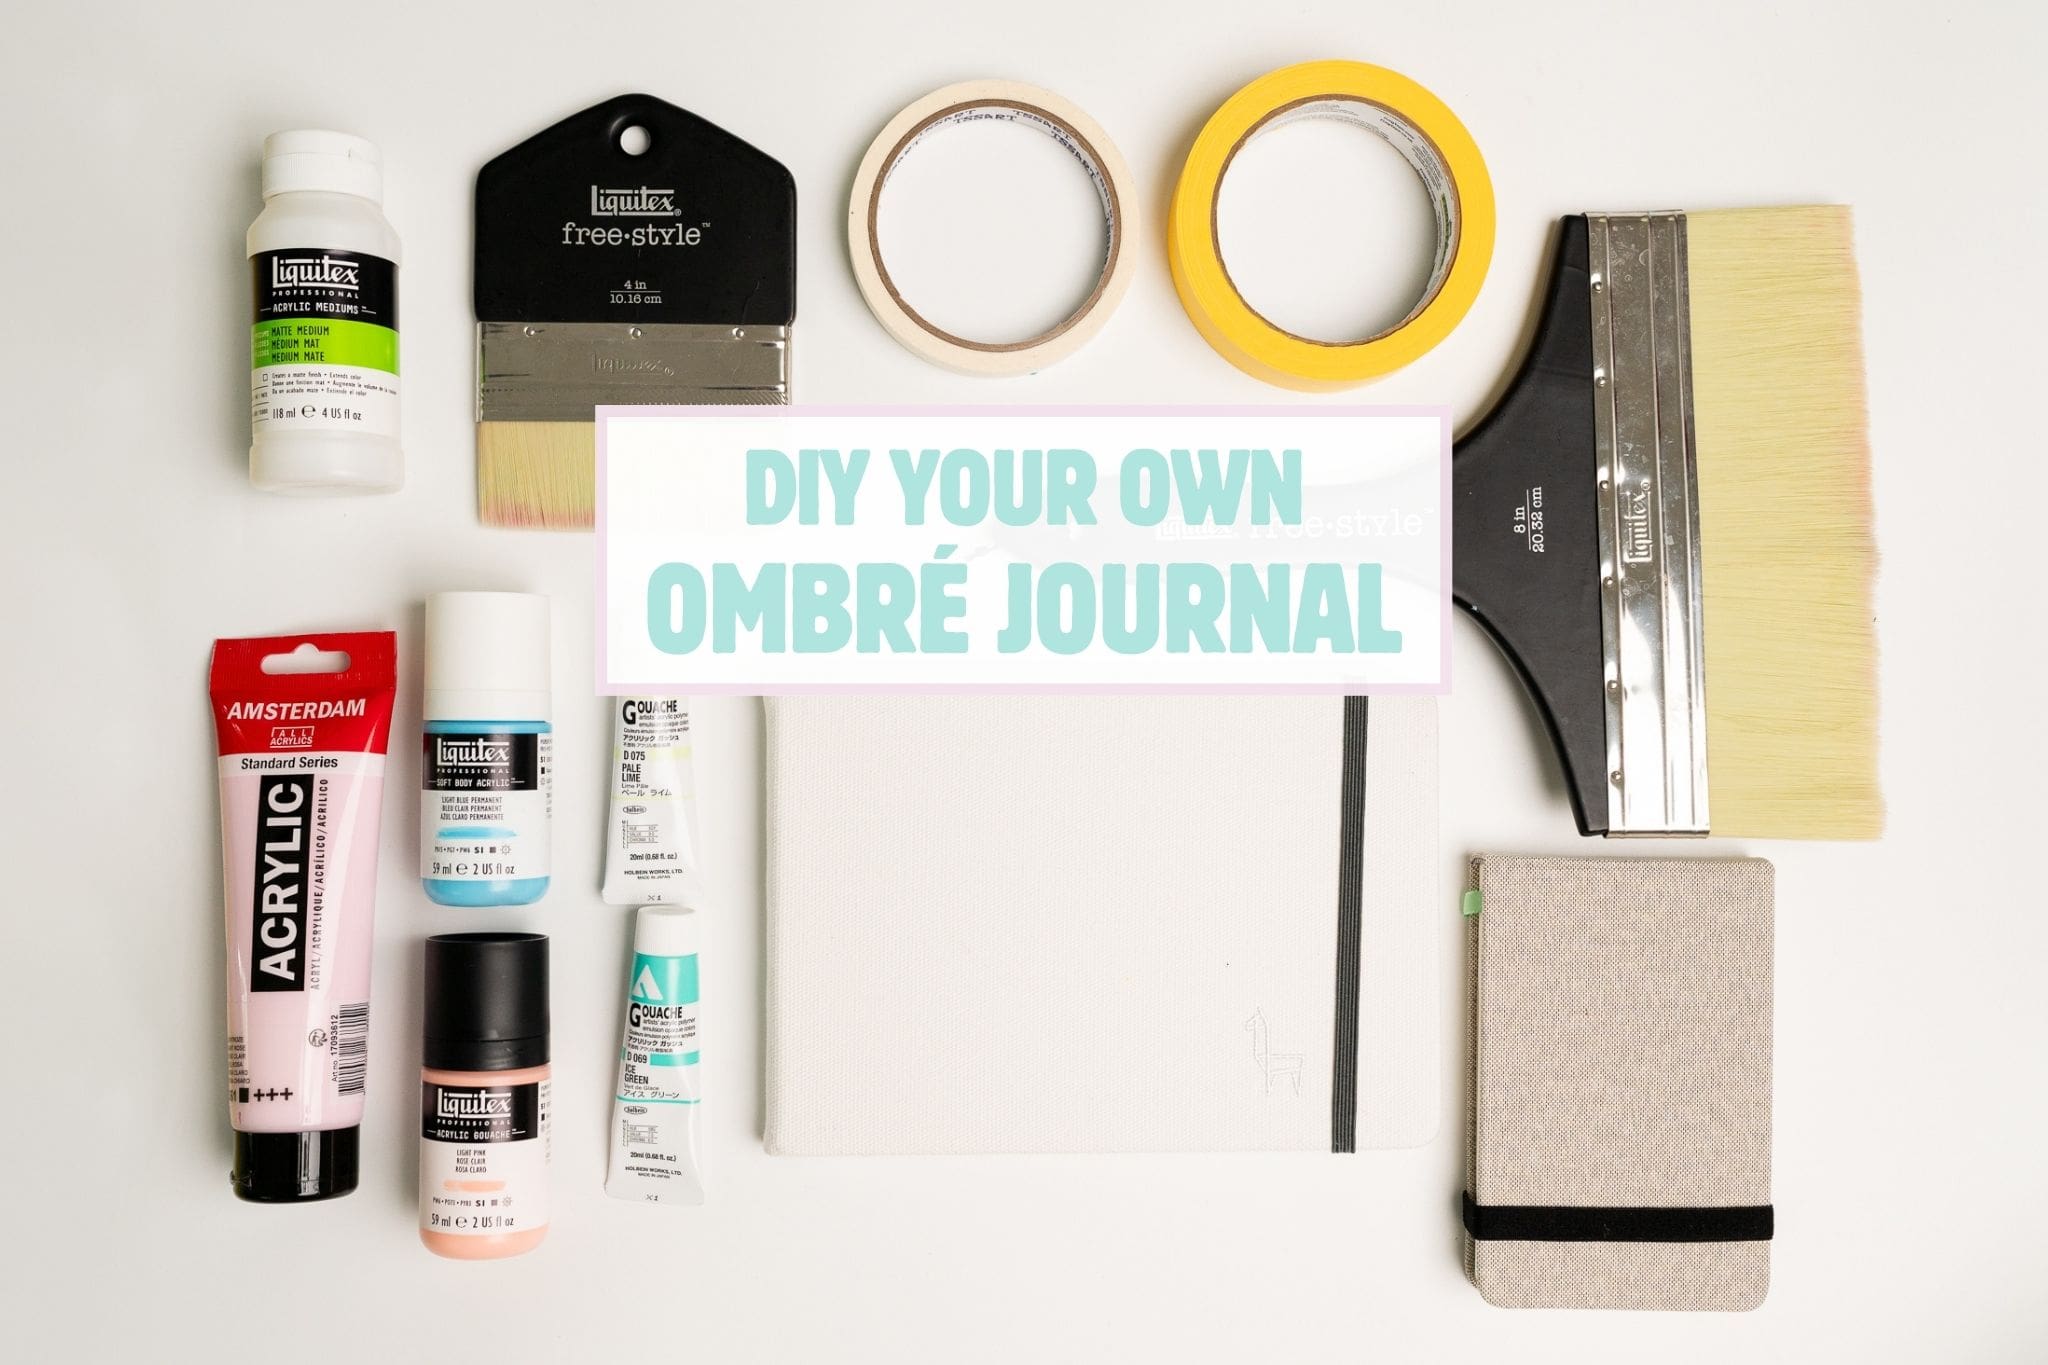
Here are the supplies that you’ll need to bring your art journal ideas to life:
- Linen Journal: A linen journal, such as the Etchr sketchbook, is perfect for this project. Its durable and textured cover provides an excellent surface for paint adherence and can withstand different mediums. A different type of journal to choose from is a watercolor journal, which has thick pages that allow you to adhere and use various materials inside. Alternatively, you could use an old book and be creative in incorporating your photographs. You can choose any size, but when using an 8-inch brush, I would suggest selecting one that is not taller or wider than 8 inches so that the brush can coat the entire cover. As you learn more, you can use a larger journal to give yourself a creative challenge.
- Painter’s Tape: Painter’s tape is essential for clean edges and protecting areas of the journal from unwanted paint. Its easy adhesion and removal capabilities make it user-friendly, ensuring no residue is left behind. For stripes, I typically use a 0.50 art tape by Tssart, and Frog Tape creates a beautiful, sharp edge.
- Matte Medium: A matte medium serves as both a protective sealer over the tape, preventing the paint from leaking through to the design below, and it can be used to seal the final design for longevity and durability. I like Liquitex Matte Medium in ultra-matte for its coating ability and how clear it dries.
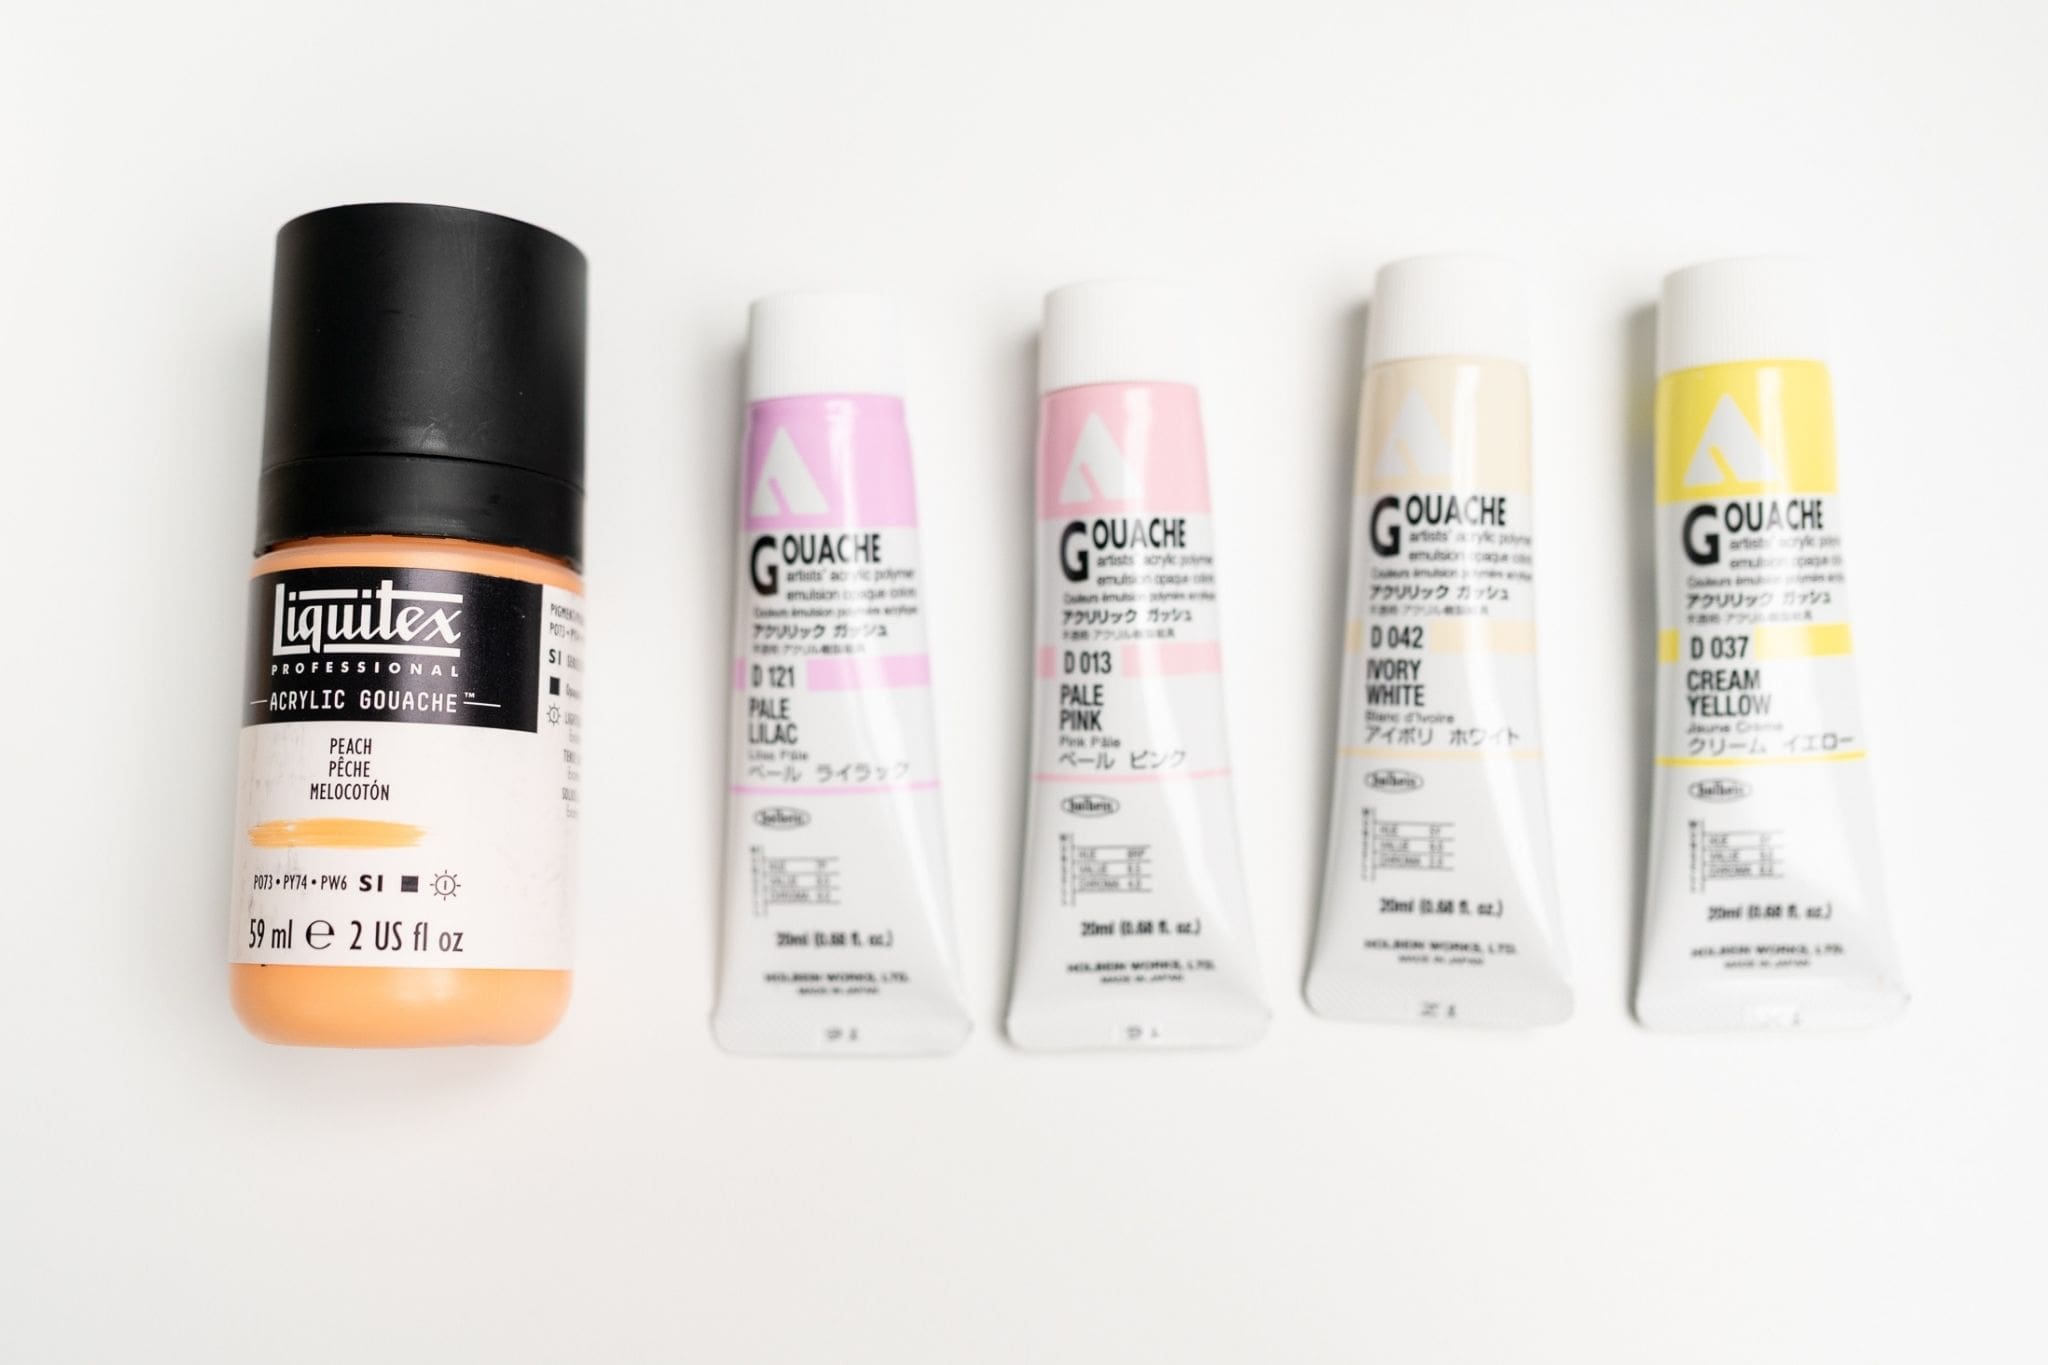
- Paints: The paints you choose will define the vibrancy of your journal; consider using acrylic paint or acrylic gouache for their rich colors and permanence. Acrylic paints dry quickly, allow for easy mixing, and can be used on various surfaces, making them ideal for this project. Selecting colors that mix well is essential, and I always test my color scheme before applying it to my cover. I have had great luck with Liquitex Acrylic Gouache paint due to its ability to blend and apply smoothly and Holbein tubes as well- specifically the pastel set. You want to use colors that speak to you, so you create a visual narrative.
- 8-inch Paint Brush: An 8-inch paintbrush is perfect for applying paint evenly across larger areas. I like the Liquitex freestyle brushes with soft bristles, which will help create smooth strokes and blend the paint.
- Cricut Machine: A Cricut machine is a fantastic tool that allows you to cut intricate stencils and designs. I use it for designing my covers, but it is not a must-have for the project. I use the sticky stencil film for this project.
- Transfer Tape: Transfer tape serves as a handy tool for transferring your freshly cut stencil onto the journal. It allows for easy positioning.
- Foam brush: A Foam brush is for painting your stencil. You could use any paintbrush, but I find the lines are better when I use one of these. No special brand is required here, but I prefer those with flat ends.
~
Step 1: Prepare the Journal Cover
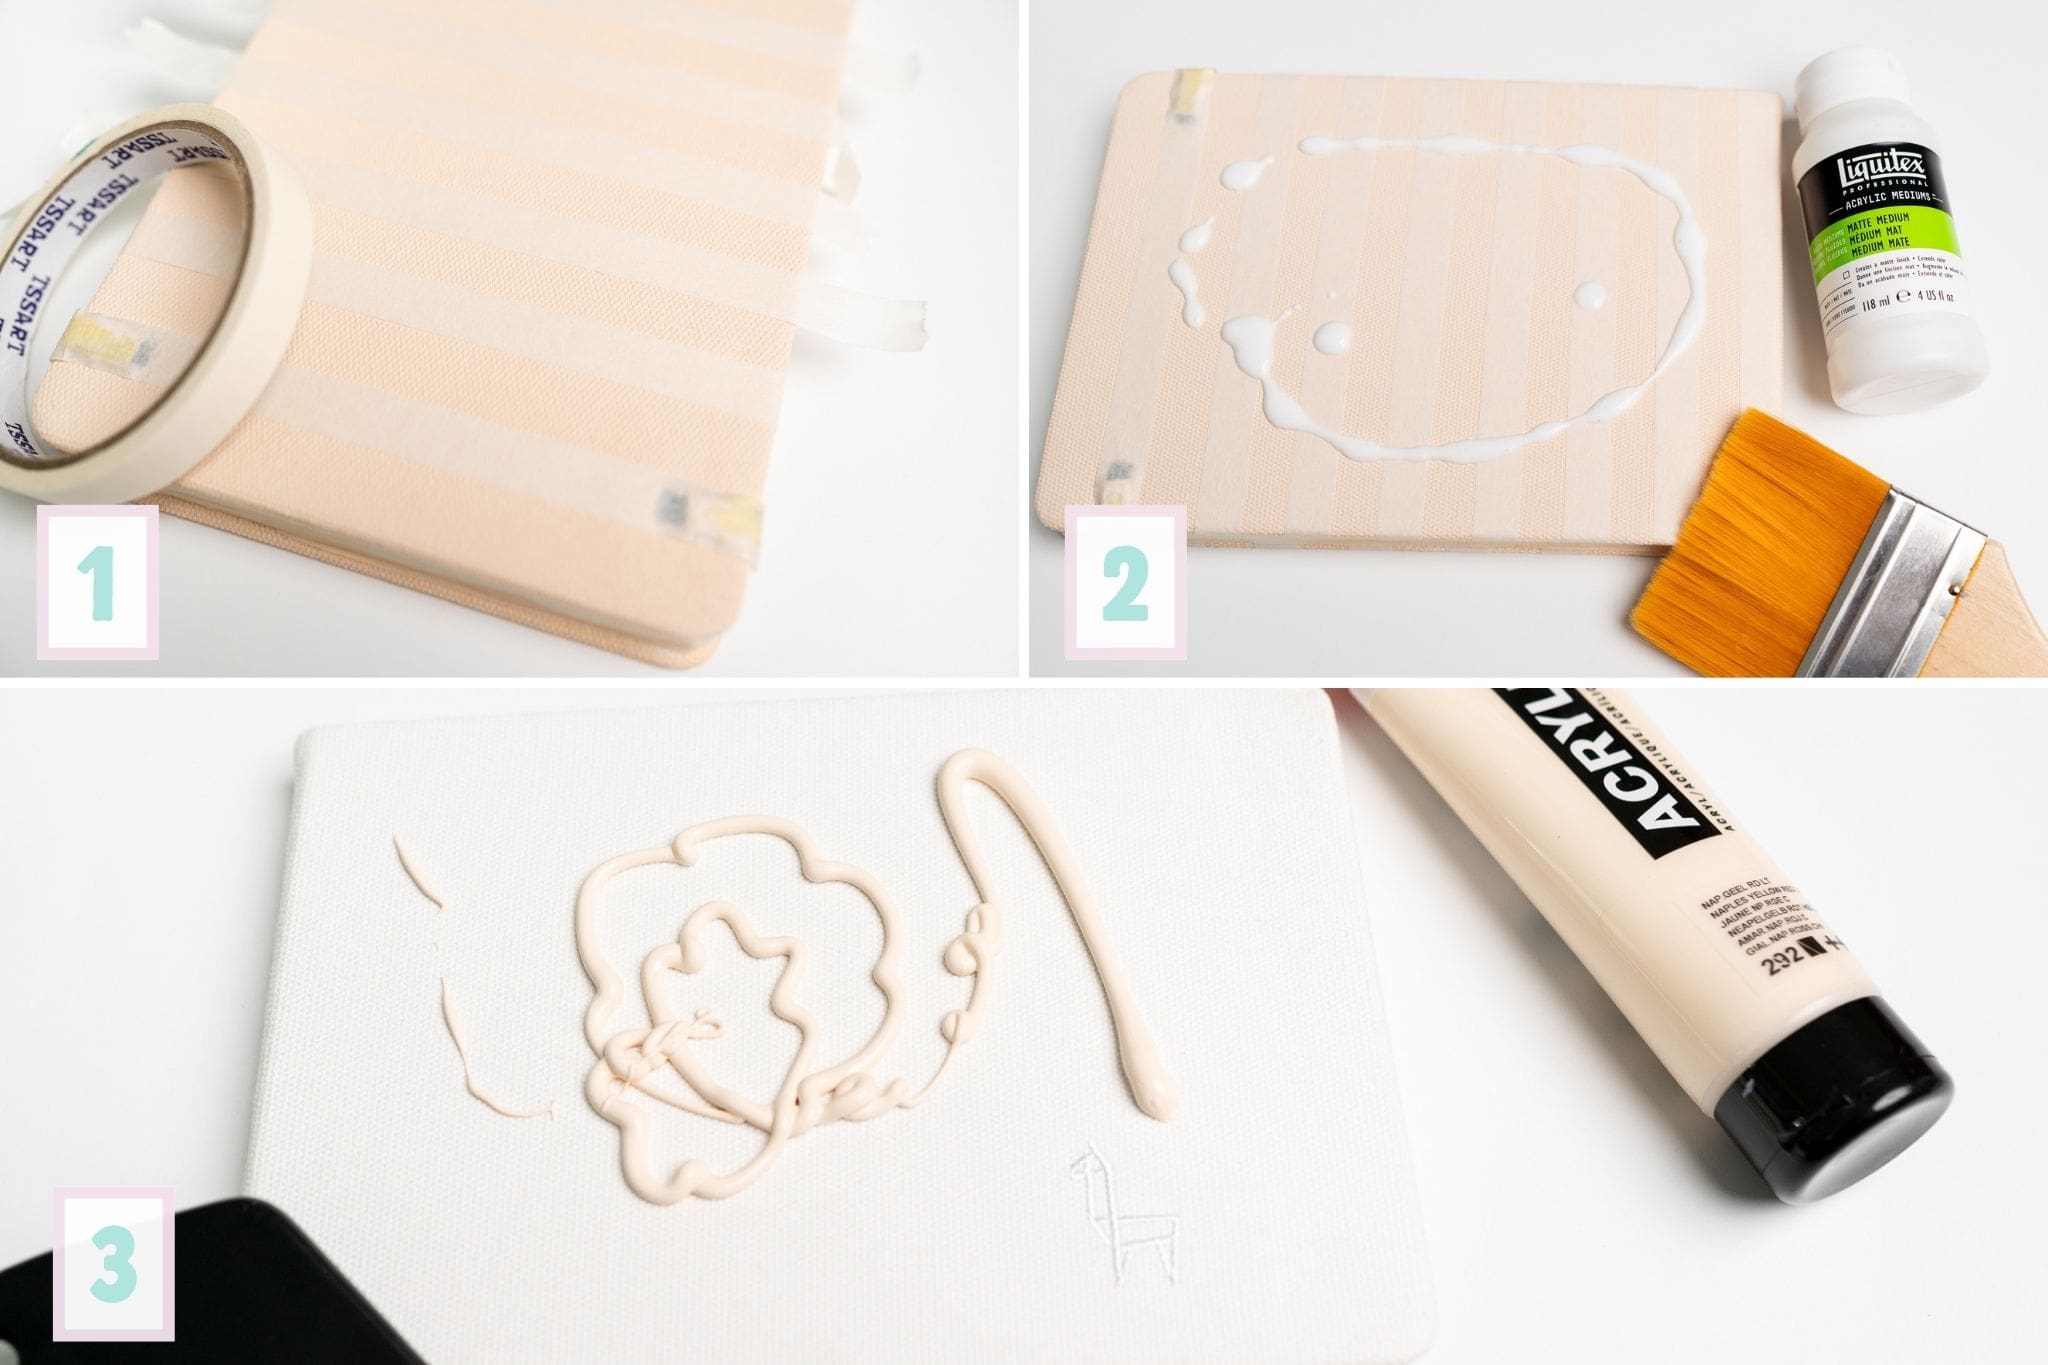
To begin, ensure your linen journal is free from dust and any debris. You can choose at this point to leave the journal bare, where the stripes are not, or have it painted in a base color (2, 3). It’s entirely up to you, and both options make for visually stunning journals. Try to pick a color that contrasts or is a lighter (or darker) shade of a color on the cover.
Tape the Cover Smoothly
1) Applying painter’s tape around the edges of your journal’s pages is essential for clean lines and defined areas. Then start laying your tape across the cover. I like to eyeball it for an organic and imperfect look, but you may want to use a ruler for accuracy. Ensure the tape extends across the edges to the underside of the cover. Press the tape down firmly to avoid any paint seeping underneath, as crisp edges significantly enhance the visual impact of your design. Consider using more petite strips for more detailed areas to fine-tune your masking.
Apply a Layer of Matte Medium
Coating the taped areas with a layer of matte medium serves as a protective barrier, keeping your journal’s surface pristine by keeping the paint from seeping underneath the tape. This foundational layer also enhances paint adhesion, enabling a smoother application later on. Moreover, it provides an added layer of durability to your art.
Let It Dry Completely
Allowing the matte medium to dry thoroughly is crucial before proceeding to painting. Drying times can vary, but ensuring a completely dry surface is crucial for preventing smudges and unintentional blending. Personally, I prefer letting it dry for at least 3 hours.
Good prep can really make a difference here, so don’t skip this process!
~
Step 2: Choose Your Color Scheme
Selecting the right color palette for your journal is a fun and essential part of the creative process. The colors you choose not only reflect your personal style but also set the tone for your journal. Taking a moment to visualize your color scheme can lead to a more cohesive and striking outcome.
Consider Your Personal Style
Choosing colors that resonate with your personal taste will create a design that feels uniquely yours. Whether you prefer bold hues or soft pastels, this decision builds the foundation for your journal’s character. Take inspiration from your surroundings, the season, your wardrobe, or your favorite color combinations to help you make a choice.
Choose 2-5 Complementary Colors
Limiting your palette to a few well-coordinated colors enhances the overall vibrancy and visual impact of your work. Complementary colors provide balance, ensuring your design is eye-catching without becoming overwhelming. Using color theory resources can help in selecting shades that harmonize beautifully. I like to think of the color wheel- am I mixing yellow and orange to make a different shade of orange? Or purple and yellow (to make brown)?
Test Small Swatches
Before fully committing to your chosen palette, testing small swatches of paint can help you see how they interact with each other. Creating small samples on a scrap piece of paper or an inconspicuous area of your journal allows for better visualization. This step can lead to adjustments that enhance the cohesiveness of your final design.
~
Step 3: Apply and Ombre the Paint
Put Lines of Paint on the Journal
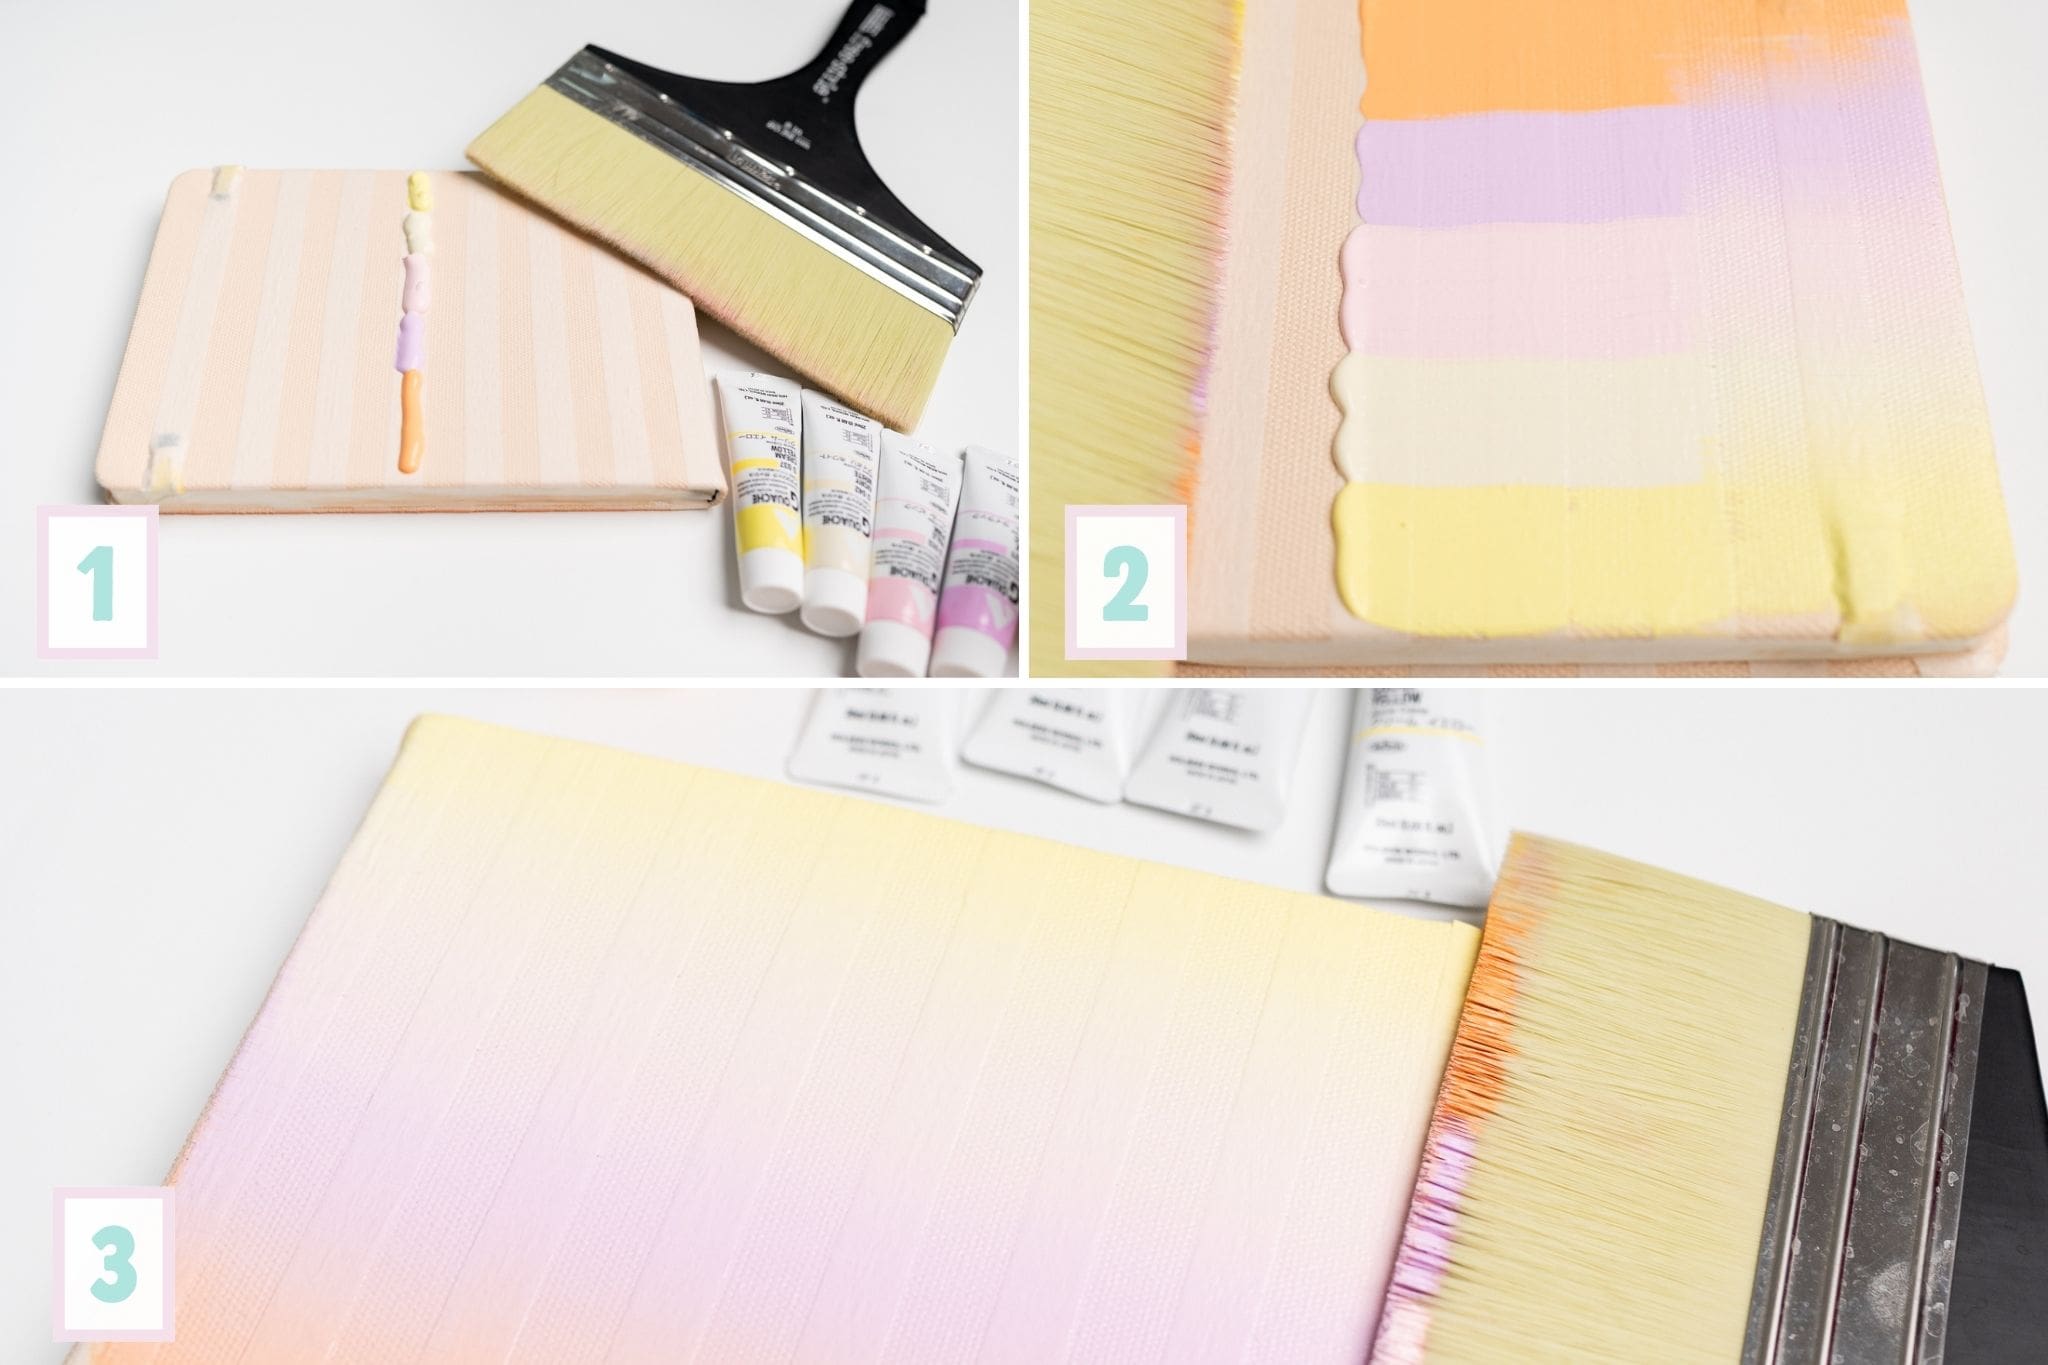
1) Lay down lines of your chosen colors across the journal cover, using varied widths and spacing to create visual intrigue. I like to put the paint down the middle stripe and blend in both directions, but that’s just my technique; there’s no wrong way to do it. I paint the cover in two turns – on the front and back separately, with time in between to allow for drying.
Use the 8-inch Paint Brush for Blending
A thin, 8-inch paintbrush is excellent for blending colors seamlessly, creating smooth transitions across your canvas. 2) I first brush the paint across the cover so that it is evenly coated. At this point, the colors are separate from each other. 3) Then I move my brush up 0.5 inches to mix the colors and blend in long, sweeping movements. Once the colors are blended, I move the brush down 1 inch to remix the colors, pulling the brush across the cover in large, sweeping movements so that it pulls the paint across and blends it smoothly. You almost want a third color made from the mixing of the two colors you laid down in paint. These steps take the longest, but you will want to work quickly before the paint dries. If you find that your paint doesn’t blend well or is drying too quickly, you can add a tiny bit of water to your brush to soften the mixture. I say a TINY bit because too much water makes a mess. This step can be a bit tricky to explain in words, so if you’re a visual person, I’ve created a YouTube video that demonstrates the process. You can find it here.
Allow the Paint to Dry
Once your ombre layer is applied, take the time to let it dry completely before painting the other side. I repeat the steps above, being careful to put the paint in the same order and spacing as the other side, because at the spine, the two coats will “meet”. Once that is finished, I leave it overnight before taking off the tape.
~
Step 4: Create Your Stencil
While everything dries, I create my stencil. I am creating a design that doesn’t have fine lines because they can be challenging to paint with the cover’s texture. The same principle applies to fonts – avoid those with fine lines and opt for bolder shapes instead.
Design Your Stencil on Cricut Software
Using Cricut design software, create a stencil that aligns with your vision for the journal cover. The software provides a range of templates, fonts, and symbols for inspiration, allowing you to incorporate personal elements easily. Pay attention to size and detail, as these aspects will significantly influence the final appearance.
Choose Sturdy Material for Cutting and Cut Your Stencil
I like their sticky back stencil film. I’m not going to go into the details on how to use the Cricut – I’m definitely not an expert, and there are better tutorials out there for that.
~
Step 5: Position the Stencil
Use Transfer Tape for Precise Placement
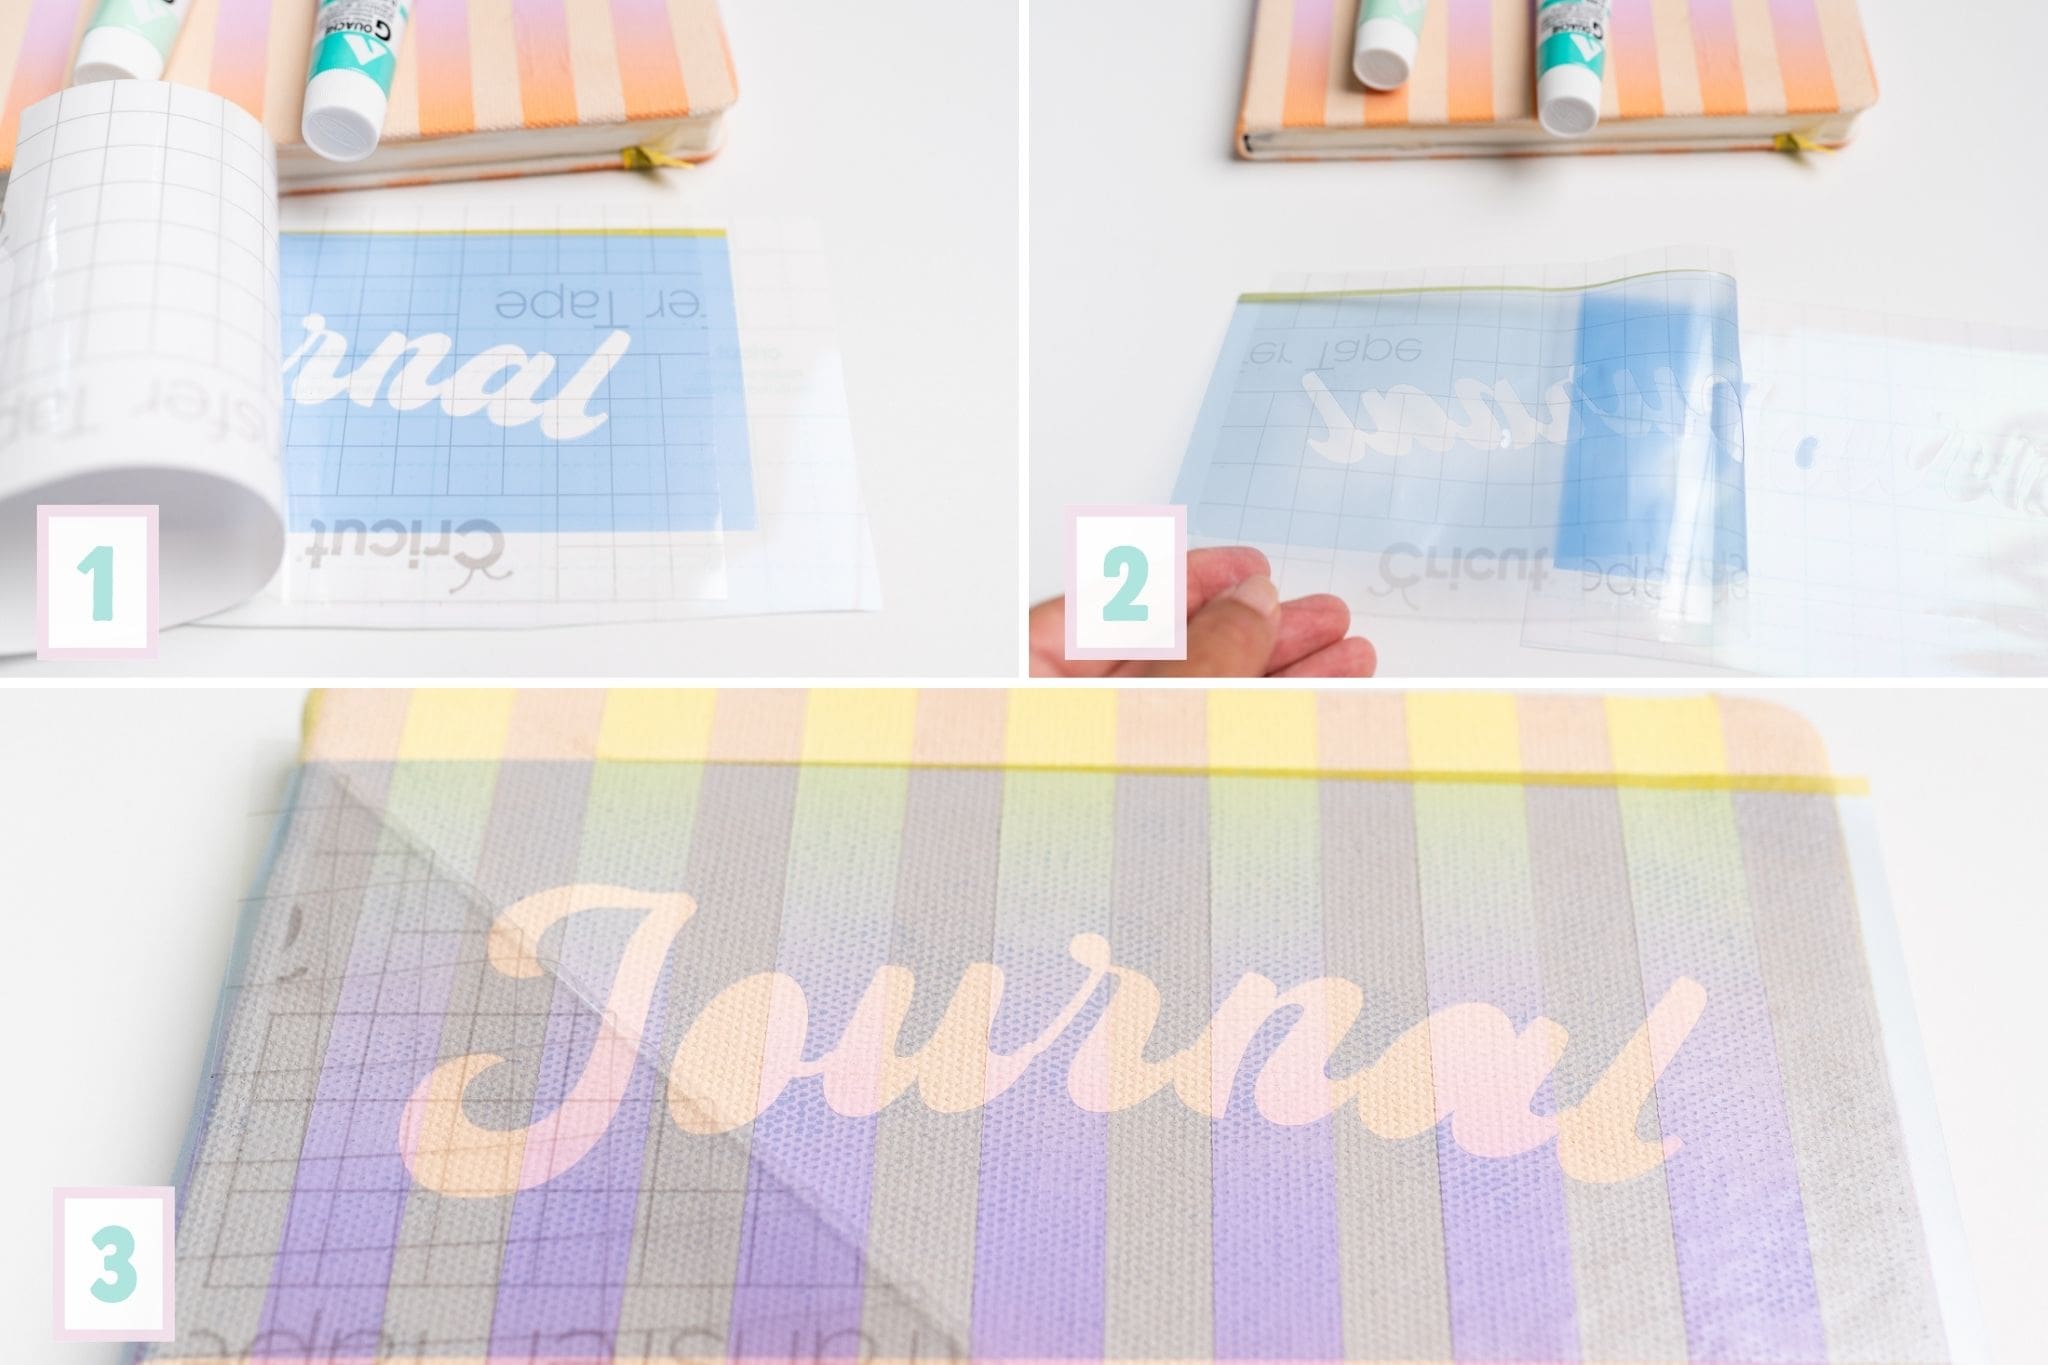
Transfer tape is a handy tool that allows for the precise positioning of your stencil onto the journal cover. Cut out a piece of transfer tape that is bigger than your design on at least one side. 1) Peel the backing off and stick it to the front of your stencil, positioning it so that the transfer tape does not cover a small area of the stencil paper (you will use this as a spot to peel off the transfer tape later). Ensure the stencil adheres without bubbles, 2) then flip it over and remove the backing from the stencil. Then flip it over again and position your stencil, making adjustments where needed.
Press Down Firmly
Once you have positioned your stencil, gently but firmly press down on all edges to secure it in place. 3) You will then want to remove the transfer tape from the front of the stencil. I put my finger on the spot where we left off without using transfer tape, so that you don’t lift the entire stencil again. Then, gently and slowly pull the transfer tape off, leaving the stencil behind. Push the stencil down again and cover it with matte medium to prevent the paint from seeping through. Taking care at this stage will pay off with a clean finish.
~
Step 6: Paint the Stencil
Painting the stencil is where your design truly comes to life, adding depth and vibrancy to your journal. This is where I will use a paint that entirely contrasts with my design, so it stands out from the cover. If the journal features pastel colors, I will use a saturated color. If colors are vibrant, I will use a lighter color here.
Use a Lightweight Brush for Precision
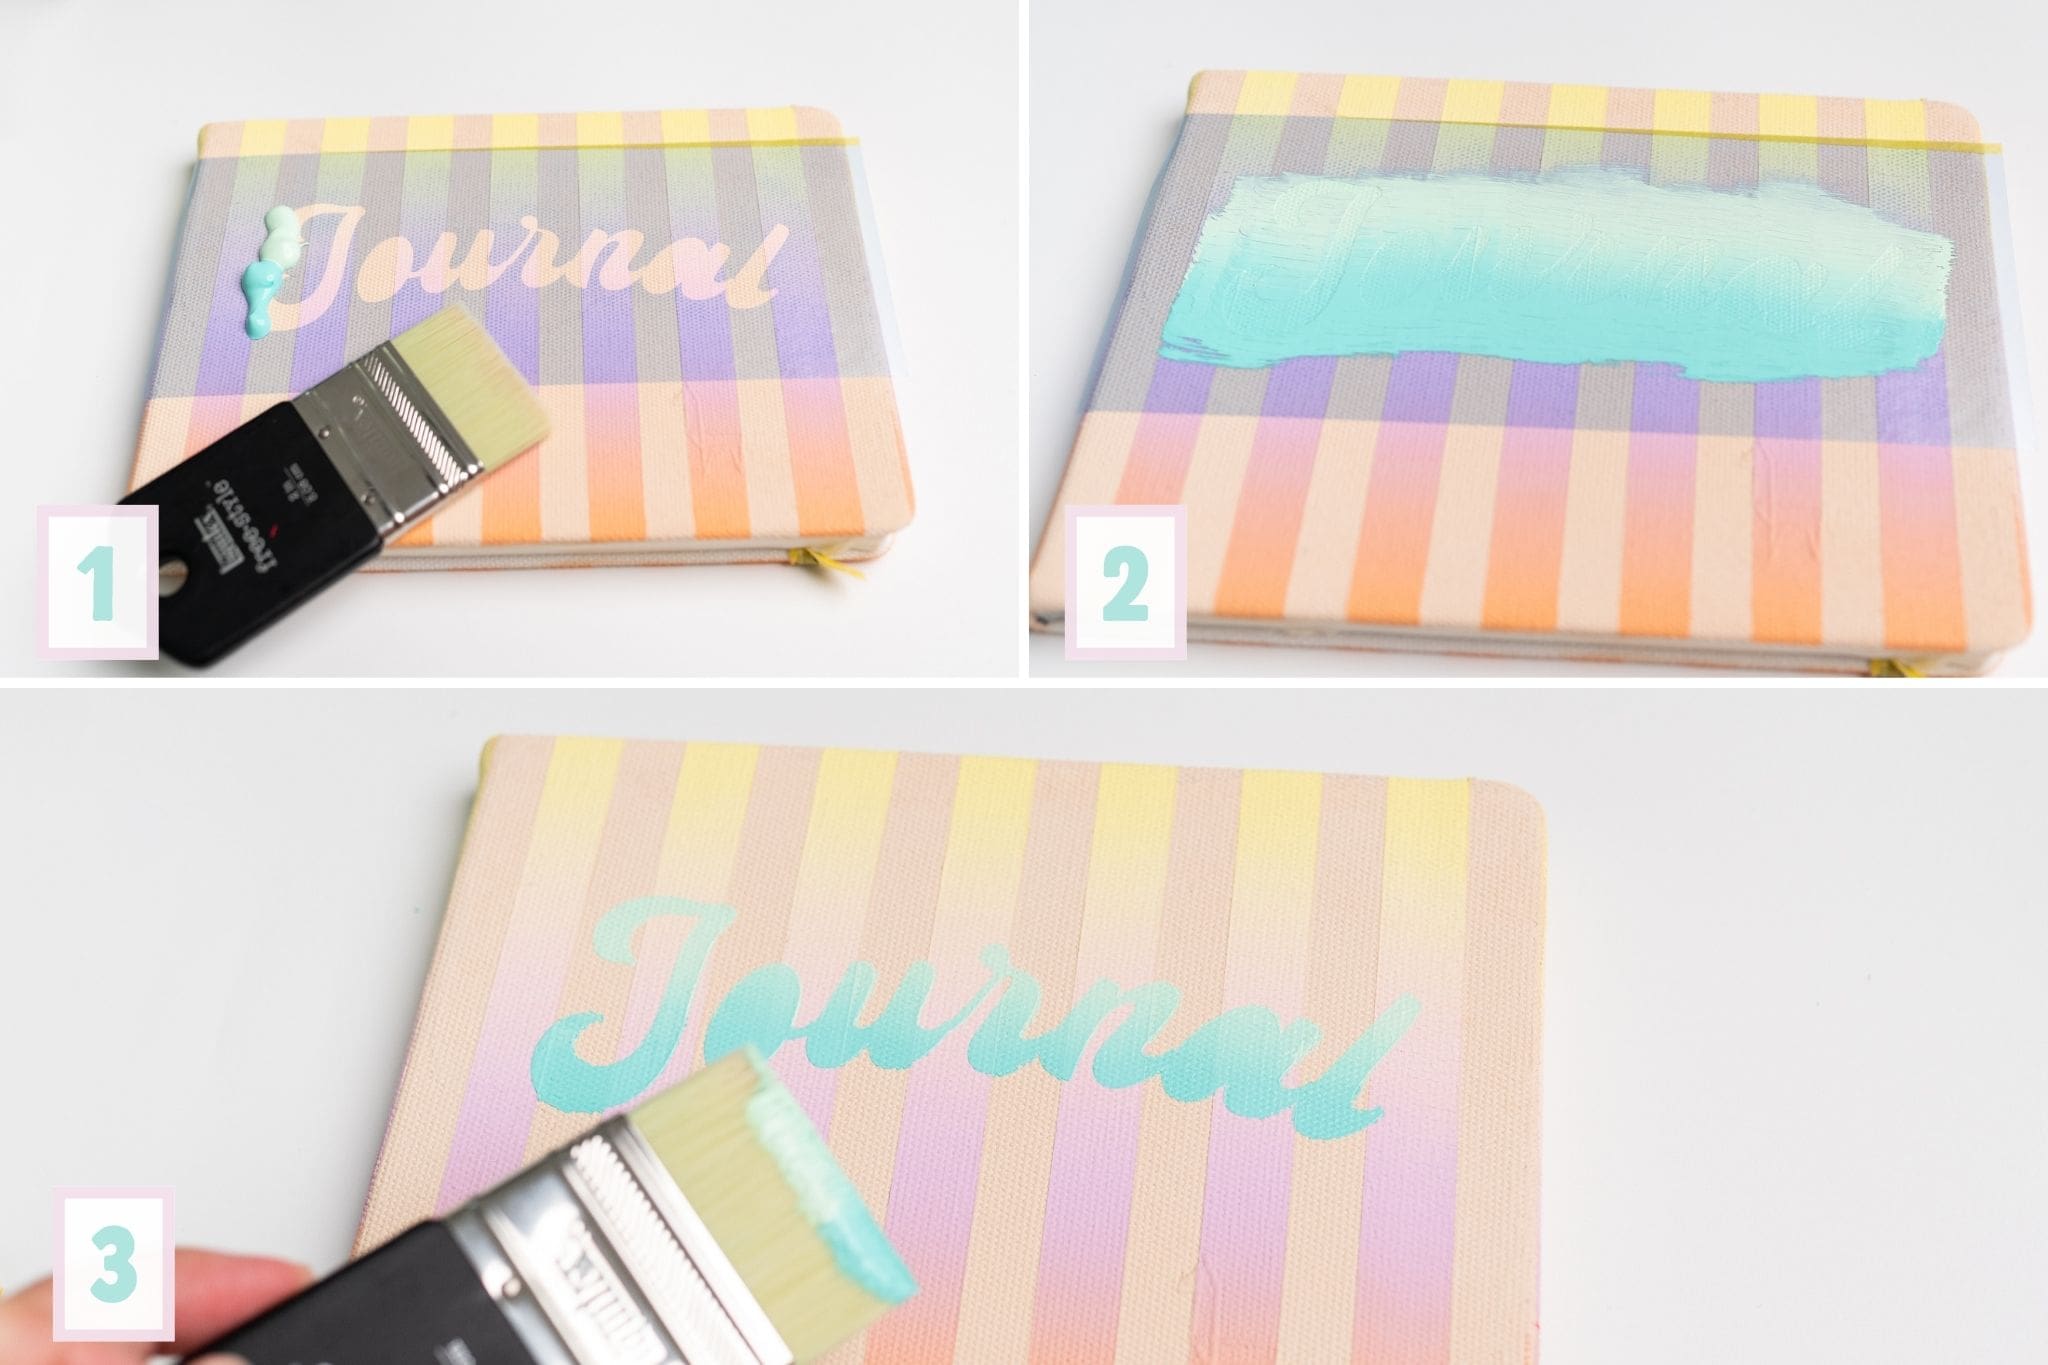
Using a lightweight brush to apply paint through the stencil allows you to create defined lines without excess paint bleeding through. 1 & 2) Apply paint gently to avoid saturation, working carefully to ensure even coverage. I like to dab my paint instead of brushing it, so it is less likely to get underneath the stencil. I will sometimes apply 2-3 coats to prevent it from going on too thick.
Peel Off the Stencil Carefully
3) Once you’ve achieved the desired paint coverage, carefully remove the stencil to reveal your design beneath. Start at one corner and peel slowly to avoid any accidental smudging, ensuring a crisp outline. Enjoy the satisfaction of seeing your vision come to life in real time.
~

Step 7: Finalize Your Design
Apply Additional Layers as Desired
If you wish to intensify your design, consider adding additional layers of paint for depth and richness. This is a creative way to amplify colors and create visual intrigue. You should approach layering with patience; allow each layer to dry thoroughly before adding another, and let your creativity guide you!
Seal with Matte Medium Again
After you’re satisfied with your completed design, seal everything in with a final coat of matte medium. This protective layer ensures your artwork withstands daily use while adding a polished appearance. Only after this step do I remove the tape from the page edges.
Let Everything Cure
Allow your journal to cure in a dust-free space for a minimum of 24 hours to ensure proper adhesion. This waiting time allows your paint and medium to bond with the journal, enhancing its durability fully. Curing is an essential step that yields a beautifully finished product, ready for personalization.
~
I have often found that focusing on something else entirely is a great way to remove creative blocks in your work. You can turn this into a travel journal, featuring dried flowers, stickers, photographs, collages from old magazines, newspaper clippings, ticket stubs, and anything else that strikes your fancy. Now is your chance to fill your beautiful, blank page journal with your thoughts and everyday life; they are a good thing. Please feel free to leave me your questions or comments below. Happy journaling!